User interface
Clicking the RunFromDir button in the Job-Display Toolbar opens the RunFromDirectory dialog.
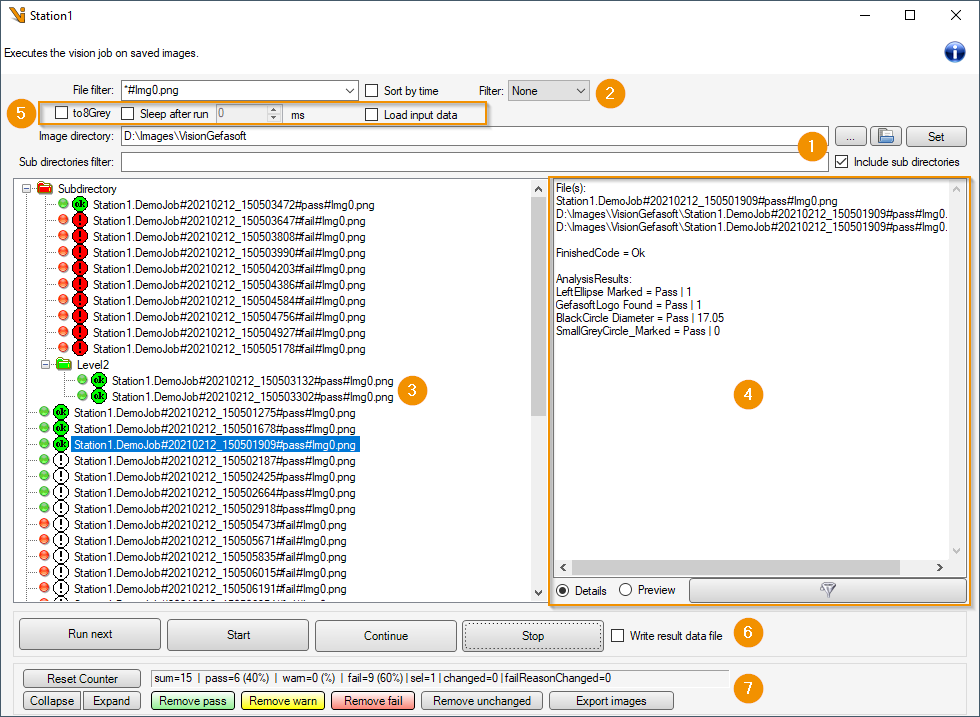
The dialog offers the following elements:
Setting directories for image search
Restriction relevant images within directories.
The imagelist shows relevant images for the job execution. The list is regenerated by a directory search when Setting the settings for images and directories (Set button). Double-clicking an image re-executes the job with the individual image. The status icon gives information about the result at the time of the original capture as well as in the last execution within the “RunFromDir”.
Displays result data for the selected image if it was saved with the image. Alternatively, a preview of the selected image file can be displayed.
Settings related to Job execution
Job execution with the loaded images.
Statistics and control the image list.
Job execution
Running the job on images in the displayed imagelist can be controlled in the button bar. Additionally, the evaluation can be started on a single image by double-clicking on the file in the list.

Runs the job once with the next image (with the image after the currently selected one).
Starts the sequential execution of the job on all images in the list, starting with the first image. Execution runs until a user aborts or until the end of the list is reached.
Starts the sequential execution of the job with the images in the list, starting with the next image in the list after the currently selected one. Execution continues until a user aborts or until the end of the list is reached.
Interrupts a sequential processing of the image list, if this is currently taking place.
Specifies whether the files containing resultdata should be created or overwritten when running with RunFromDir. The option automatically disables itself after each execution to prevent accidental overwriting of files. The stored evaluation status of the image (coded in the file name) is not affected by this.
Warning
If the option to write result data is active, existing result data will be overwritten if necessary. The option is only available for users to whom the Operation RfD.WriteResultDataFile is assigned.
The execution is additionally influenced by the following options:

If the option to8Grey is set, the images are passed to the toolgroup as 8-bit grayscale images and converted if necessary.
If active, there is a pause with the set duration after each execution during the sequential processing of the list. In this way, the processing speed of the list can be reduced, for example, in order to observe the results live.
If LoadInputData is set, an attempt is made to load saved input data before execution. If the option is inactive or no input data was saved with the image, the respective input-terminals keep their current values for execution.
Directory selection
The image list of the RunFromDir is generated during a search starting from a root directory. The entire tree of subdirectories can be included in the search. From this, all images that match the imagesettings will be included in the list.

Setting the preferences triggers a search for images that match the selected criteria.
The root directory for image search.
Select whether subdirectories are to be searched.
Optional filter of subdirectories: contained subdirectories are only searched if the name filter applies to them. Asterisks (*) are used as wildcards.
Opens a file dialog for selecting the root directory.
Opens the directory in the file browser.
Warning
All changes are only applied when the image list is regenerated by setting the setting.
Image selection
The relevant directories are searched for images when setting the preferences to create a new image list for RunFromDir. Images are only included in the result list if they meet all active criteria at the same time.

Filter for valid file names. Image files are only included in the image list if the file name matches the filter. Asterisks (*) are used as placeholders.
The image list is sorted by the timestamp. The default is alphabetical sorting.
Selection by timestamp: the time span of relevant images can optionally be set to a fixed time period in the past or a time period prior to the current image search
Warning
All changes are only applied when the image list is regenerated by setting the setting.
Examples of file name filters:
“*” displays all files in the specified path.
“*.bmp” only displays files with the extension “.bmp”.
“*#Img0.bmp” only displays “.bmp” images with the extension “#Img0.bmp”.
“Station1*#Img0.bmp” will only display files starting with “Station1” and ending with “#Img0.bmp”.
“*Station1*#Img0.bmp” displays files with any beginning, which contain the text “Station1” and end with “#Img0.bmp”.
“*pass*#Img0.bmp” displays “.bmp” images with the extension “#Img0.bmp” that were evaluated as IO when the image was captured.
“*fail*#Img0.bmp” Displays “.bmp” images with the extension “#Img0.bmp” that were evaluated as NOK when the image was captured in Viper.NET.
Hint
If a job with multiple image sources is to be executed in RunFromDir, the file name filter must be set so that only the images from the first image source are included in the list. Example: “*#Img0.png”. All further image sources are then automatically assigned the images whose file names only differ in the counter (*#Img1.png, *#Img2.png, …).
Image list
The file list shows a selection of images for RunFromDir. When setting the search criteria, a new image list is created by searching all images in the source directory that match the criteria. The displayed list can be edited:
Marked items are removed from the list when the Remove key is pressed. They remain in the file system and will be added back to the list the next time the directory is searched.
In the context-menu (right-click) selected items can be deleted from the file system.
Items can be removed from the list based on their result status removed.
If additional input images were found for a listed input image due to the naming convention for jobs with multiple image-sources, the total number of images is given in square brackets to the left before the filename: [<NUMBER>]
The color of two icons to the left of the file names visualize the result status of the image: The icon on the left shows the status at the time of image acquisition based on the file name. The icon on the right shows the result of the most recent execution in the current RunFromDir. A grey icon indicates an unknown result, green an evaluation as “Good”, yellow an evaluation as “Warning” and “Red” an evaluation as “Bad”. The rating status at the time of capture is derived from the file name. All RunFromDir rating results are set as unknown when (re)generating the list.
Examples:
no evaluation result at the time of image acquisition, “Good” at the last run-through
no result available
Rated as “Warning” when image was captured, rated as “Good” in the final pass.
Rated as “Good” for image acquisition and in the final pass
Rated as “Good” on image acquisition, “Poor” on final pass.
Rated as “Poor” on image acquisition and on final pass
Rated as “Poor” when image was captured, rated as “Good” in the final pass.
Rated as “Bad” when image was captured, but no result available yet in RunFromDir.

Removes all images from the list that have been rated as “Good” at least once. Both ratings, at image acquisition and in the last execution within RunFromDir are taken into account.
Removes all images from the list that have been rated with “Warning” at least once (on capture or in the current RunFromDir).
Removes all images from the list that have been rated “bad” at least once.
Removes all images from the list whose evaluation result at the time of image acquisition matches the evaluation in the current RunFromDir.
Opens a dialog to export the currently selected images from the list to a separate folder.
Reduces the display of subdirectories in the list so that only the contents of the root directory are displayed.
Expands the display of the list so that all images in all subdirectories are visible.
Selected images and directories in the image list can be edited via context menu:
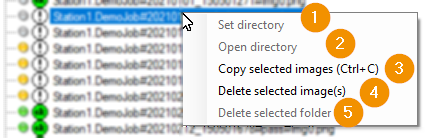
Sets a selected directory as source-directory and triggers the rebuild of the image list.
Opens a selected directory in a new window of the file explorer.
Copies selected directories and images to the clipboard, including the associated input and result files if they exist.
Removes the selected images and associated data from the file system.
Removes the selected folder from the file system. In particular, all contained files are also removed, even those that are not displayed in the image list due to the filter criteria!
Hint
Delete functions for directories and images are only available for users who are assigned the Operation RfD.DeleteImages.
Export images
Input images of the RunFromDir can be exported as a copy to other locations. There are two ways to do this:
With the Export images button (at the Buttons to control the image list) the following dialog can be opened to export the whole image list:
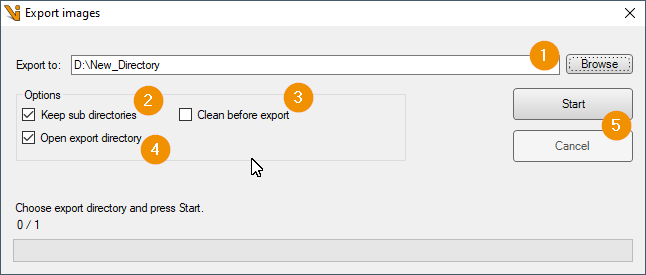
Sets the destination directory for the export.
Sets whether to copy the directory structure to the destination directory. If creating the directory structure is disabled, images from subfolders of the source directory are copied directly to the destination directory.
Deletes everything from the target directory before starting the export.
Opens an Explorer window of the target directory after the export is complete.
Start and abort of the export process. If you cancel, files that have already been copied will not be deleted!
An image export can also be done directly in the image list: The selected files in the imagelist can be copied to the clipboard in the context menu (right-click) or by keyboard shortcut ( [Ctrl]+[C] ) to paste them in the file system afterwards.
Hint
Selected directories are copied completely via the clipboard: the copy contains all files of the source directory, even if they are not displayed in the image list.
Statistics
At the bottom of the RunFromDir dialog a statistic about the evaluation results of the images is displayed.

After creating a imagelist by setting the settings with the Set button, the statistics (1) first records the stored evaluation results of the images at the time of image acquisition. Each time the job is executed as part of the RunFromDir>`, the counters are updated according to the evaluation result. By pressing the **Reset Counter* button (2), all entries of the statistics can be reset to 0 at any time.