IDS µEye
Before using an IDS-µEye camera, the software ‘ids-software-suite-full-64-49300uEye64_49300_WHQL.exe’ must be installed. At all LAN adapters with IDS-µEye camera the ‘Gigabit Ethernet uEye Service’ must be activated.
Hint
The ‘Baumer Filter Driver’ must be uninstalled ! The software ‘uEye_Cognex’ must be uninstalled for uEye SDK. Possibly the firmware version of the camera does not match the uEye SDK version. The software ‘uEye Cockpit’ will automatically install the correct firmware on the camera.
General settings

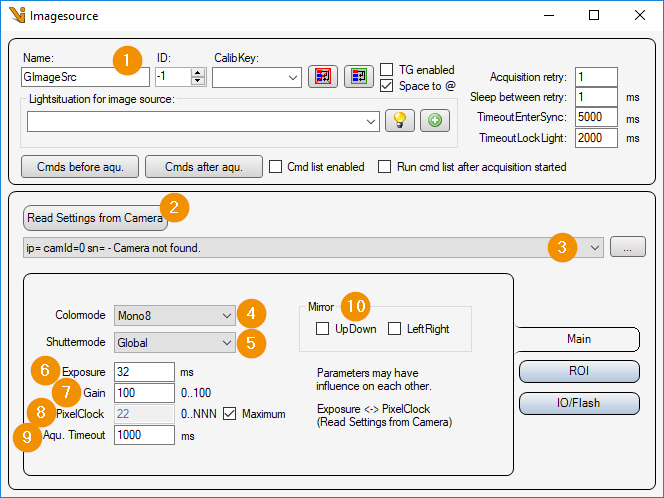
General Settings: Image Source Editor
Read Settings from Camera: Read all parameters from the camera and assign them to this image source or image acquisition parameter set.
Camera list: Selection list of all IDS µEye cameras. The list can be updated with the ‘… - button’ to update the list.
Color mode: Color mode or pixel format in which the camera image is to be transmitted. Depending on the camera type, the following pixel formats can be set, for example:
Mono8/10/12/14/16 : Gray scale image with 8/10/12/14/16 bits per pixel
RGB8Packed : Color image with red green blue pixels.
Shuttermode:
Global : All pixels of the camera chip are reset and exposed simultaneously.
Rolling : The pixels of the camera chip are reset and exposed line by line.
Exposure: Exposure time in [ms].
Gain: Analog gain factor (brightness).
PixelClock: Specifies how many frames per second should be captured. If the data transfer is slower than the frame rate, ‘Maximum’ must be deselected and the PixelClock reduced.
Aqu. timeout: Maximum image acquisition time in [ms].
Mirror:
UpDown: Mirror the camera image around the horizontal axis.
LeftRight: Flips the camera image around the vertical axis.
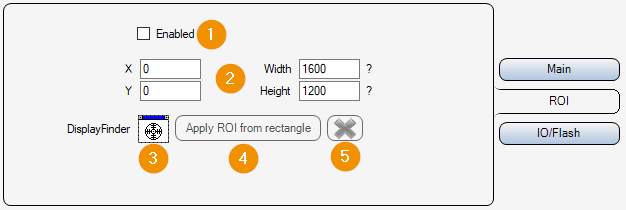
ROI settings

ROI Enabled: Enable or disable image cropping. If deactivated, the entire camera chip is read out and transmitted.
X/Y/Widht/Height: Selected image area. Position of the upper left corner, width and height.
DisplayFinder: With the display finder, a Cognex display (e.g. FormLive) can be selected via drag & drop, which is used for an interactive input of the image section.
Apply ROI from rectangle: Apply image section from rectangle of interactive input.
Cancel: Cancel interactive image selection (remove rectangle from display).
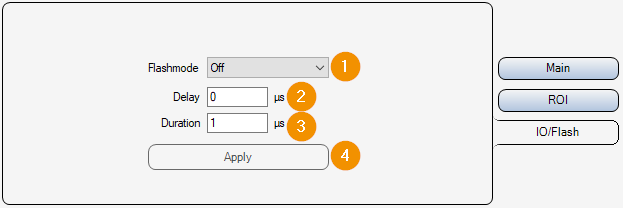
Inputs Outputs

Flash mode: Activate or deactivate the flash output of the camera.
Delay: Delay between the start of exposure and the activation of the flash output in [µs].
Duration: Duration of the flash signal in [µs]. If the value ‘0’ is set, the flash output remains set until the end of the exposure of the camera chip.