Lumos Basics
Lighting controls and their light channels are created and set in Lumos. Lighting situations, i.e. the combination of brightnesses of individual lighting channels, can also be added and set here. These lighting situations can be applied, for example, in Image-sources or Toolgroup Items. The paths of the Lumos files are configured in the Viper project file (*.makproj).

lumosConfiguration: File name for the settings of the lighting controls and channels (relative to the Viper project file).
lightSituationsFileRequired: Specifies whether the file for the light situations must exist.
lightSituationsFile: File name for the light situations (relative to the data directory).

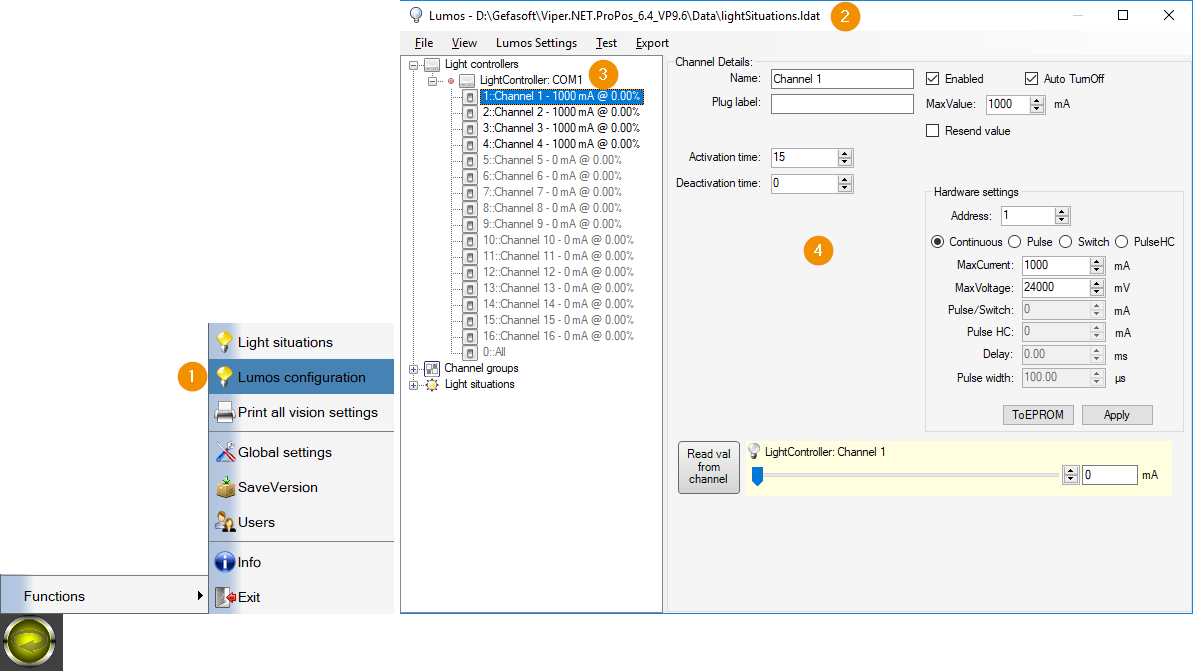
Viper main menu: Opens the Lumos settings dialog.
Lumos main window: The title bar of the Lumos dialog shows the location of the lighting situations.
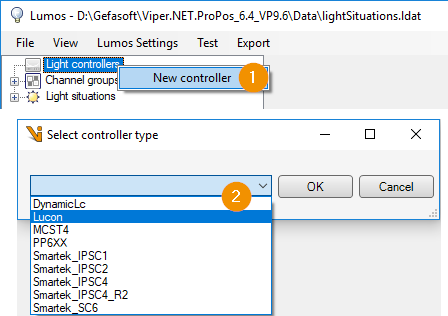
Lumos treeview: Right click on ‘Light controllers’ opens the context menu to add a new light controller. Right-click on a light controller (e.g. ‘Lightcontroller: COM1’) opens the context menu to delete the light controller.
Lumos settings page: Detailed settings of the element selected in the tree (see 3.) (LightController, LightChannel, LightSituation).
LightController and Channels
New lighting controls are created via the context menu.

The following lighting controls are available for selection:
DynamicLc: Dynamic LightController
Lucon: Gefasoft Lucon
MCST4: Gefasoft MCST4
PP6XX: Gardasoft PP6X
Smartek: Smartek
General light channel settings

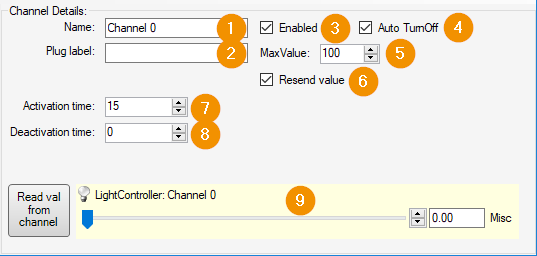
Name: Displayed name of the light channel.
Plug label: Label on the light channel socket or on the lighting cable.
Enabled: Enable or disable channel. Only active channels can be controlled via Lumos.
Auto TurnOff: Activate automatic switch-off after non-use for this lighting. The switch-off time is set globally for all lights in Viper.NET.
MaxValue: Maximum brightness value or software limit for the lighting.
Resend value: The new brightness value is only sent to the light controller if it deviates from the current value or ‘Resend value’ is activated.
Activation Time: After changing the brightness value, the activation time is waited for.
Deactivation time: After switching off the light or changing the brightness value to zero, the deactivation time is waited for.
Value: Currently set brightness value.
Hint
The unit of the brightness value depends on the type of light controller. In most cases, the brightness is specified via the current intensity in [mA] or as a percentage of the maximum brightness.
Lighting situations
Lighting situations define one brightness each for a set of selected lighting channels. They describe the different lighting states of the system for individual image exposures. Several lighting situations can be active at the same time on a system, provided they do not control the same lighting channels.
In Lumos, predefined lighting situations can be created and edited. These are then globally available and can be used in image sources or tool group items, for example.

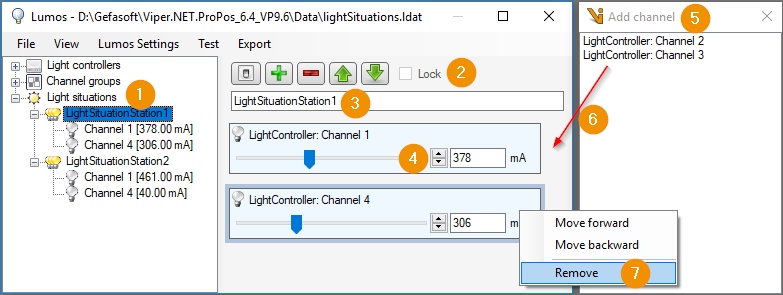
Lumos Treeview: Right click on ‘Light situations’ opens the context menu to add a new light situation. Right click on a light situation (e.g. ‘LightSituationstation1’) opens the context menu to delete the light situation.
Lightsituation Toolbar:
Activating the lighting situation
Opens the window with the available light channels (see 6.)
Deletes the marked light channel from the lighting situation
Move the marked light channel down/up. The channels are activated in sequence from top to bottom.
Lightsituation Name: Name of the lighting situation.
Channel Value: Brightness of the light in this lighting situation.
Available lightchannels: List of available light channels.
Add light channel: A light channel can be added to the light situation via drag & drop.
Lightchannel context menu: Right-click on a light channel to open the context menu for removing the light channel from the lighting situation.