ToolBlockSelectorTool
With the ToolBlockSelectorTool it is possible to switch dynamically between different ToolBlocks.
Switching is done by selectors which define input terminals. During tool execution, their value decides which ToolBlock is executed. There can be multiple selector terminals that form a common key for ToolBlock selection.
The toolblocks to run are defined in the tool defines. Each toolblock is associated with a key value and a name: The name is simply for user identification. The key value determines the toolblock selection during tool execution: if the toolblock key matches the selector key formed from the values of the selectors, it is selected.
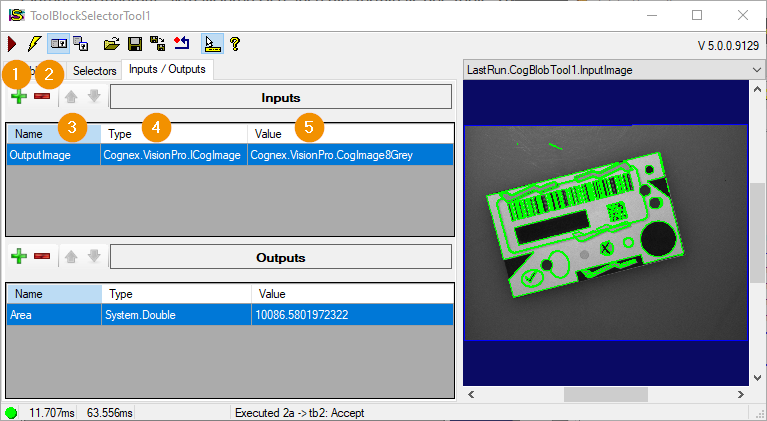
Inputs/Outputs tab:
For dynamic switching to work, all ToolBlocks must have the same interface, i.e. identical inputs and outputs. This interface is defined in this tab. If a new input/output is added, both the terminals of the tool and of all containing TooBlocks are updated. When calling the ToolBlockSelectorTool, all inputs are passed to the ToolBlock to be executed and the outputs are taken over after execution.

Add new item: Adding a terminal (The desired data type must be specified)
Delete selected item: Delete the selected terminal
Name: Name of the terminal
Type: Data type of the terminal (for an existing terminal, the data type cannot be changed).
Value: Current value of the terminal
Hint
Inputs can alternatively be created outside the ToolTree by dragging and dropping other terminals onto the ToolBlockSelectorTool node.
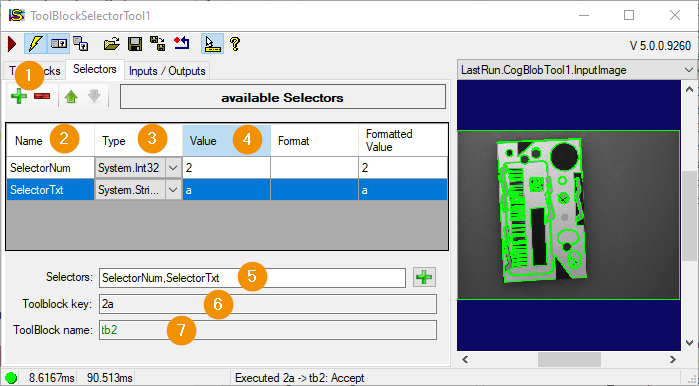
Tab “Selector”:
To control the selection of a ToolBlock, a key must be defined. This is generated from one or more so-called selectors, which are defined in this tab. A special input terminal is created for each selector. The key for the ToolBlock selection is the concatenation of the selector values.
The “Selector terminals” are marked with this icon  .
.

Plus/Minus: Adds or deletes the selected selector
Name: Name of the selector and its terminal
Type: Data type of the selector terminal
Value: Current value of the selector
Format: Format string that is used to convert a number into a string. Mainly used to achieve equal data lengths, regardless of the input (example: Data = 1; FormatString = 000 -> Result = 001). All .NET format strings are supported, but it is recommended to use only “000…” to get strings of equal length.
FormatedValue: Preview of the formatted string
Selectors: Comma-separated list of selectors from which the toolgroup selection key is derived. Selectors can be selected and appended via the Plus symbol to the right of the text box.
Toolblock key: Display the current value of the selector key as it results from the concatenation of the current and formatted terminal values.
ToolBlock name: Name of the ToolBlock that would be selected based on the current key value
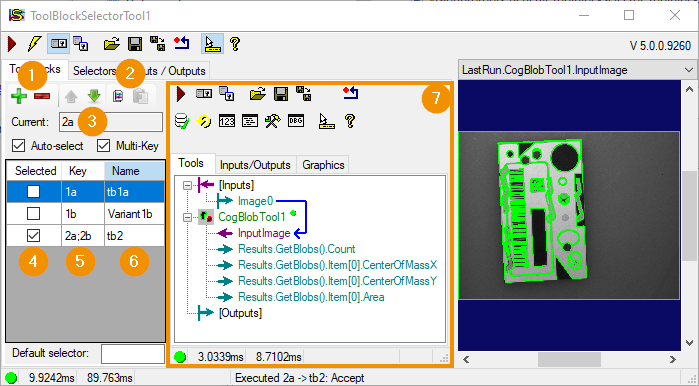
Toolblocks Tab
This tab defines the ToolBlocks that can be switched between. All ToolBlocks have the same inputs and outputs, but their content can be arbitrarily different. In addition, the unique key must be defined for each ToolBlock.

Plus / Minus: Adding a new (empty) ToolBlock / Deleting the selected block
Up / Down-Arrow: Move the selected toolbar up and down in the list
Copy / Paste: Copy the selected tool block and paste a copy into the list
Current: Preview the current toolblock selector key, based on the values of the selectors (in this example: 2a)
Selected: Displays the currently selected ToolBlock. If AutoSelect is deselected, another ToolBlock can also be selected. AutoSelect only works in the user interface. In the process, the ToolBlock is always executed on the basis of the selector key.
Key: This sets the key for the one ToolBlock. If the key string matches the current selector key (4), the tool block is automatically selected. Multiple keys can also be assigned for a ToolBlock if Multi-Key is activated. The keys are then separated by semicolons “;”. Example: “3;4” -> no space.
Name” column Name of the ToolBlock: Has no meaning for the auto-selection.
Toolblock Editor. Here the currently selected tool block is edited, i.e. the one whose Selected checkbox is active. Editing the ToolBlocks is done in the same way as for a standard Cognex ToolBlock.
Default selector: Optionally, a key value can be entered here, which serves as a default fallback: if the value is empty, it is ignored. Otherwise, if no matching toolblock is found for the current terminal-based selector key, the Default-selector is used for selection.
Hint
It is also possible to add or delete new inputs / outputs when editing the individual ToolBlocks. However, these changes are applied to all defined ToolBlocks.