Allied Vision
Image source for Allied Vision GigE cameras (e.g. Alvium G1) based on the ‘Vimba .NET API’.
Before an Allied Vision camera can be used, the ‘Vimba SDK 6.0 (Win64)’ from Allied Vision must be installed. During the installation, at least the ‘Vimba GigE Transport Layer’ must be selected. The ‘Vimba .NET API’ (version 1.8.5) is shipped with the Viper.NET plugin and does not have to be installed separately.
General settings
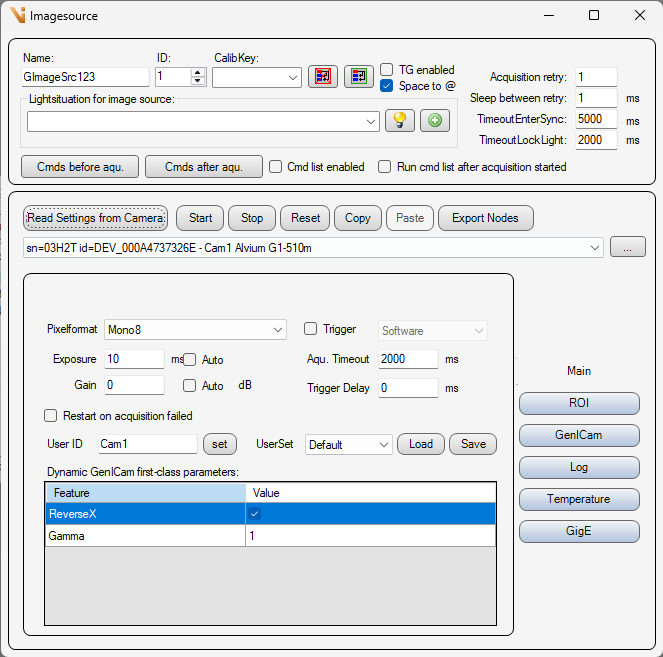
General settings: Image Source Editor
Read Settings from Camera: Read all parameters from the camera and assign them to this image source or this acquisition parameter set.
Start/Stop/Reset:
Start: Start the camera and prepare it for image acquisition.
Stop: Stop the camera and exit the image acquisition mode.
Reset: Reset all camera parameters to factory defaults. This loads the ‘UserSet Default’.
Copy/Paste:
Copy: Copy this parameter set to the clipboard.
Paste: Apply the parameter set from the clipboard to this image source.
Export Nodes: Read all parameters from the connected camera and export them to an XML file.
Camera list: Selection list of all Allied Vision cameras (serial number, ID, name and model). The list can be refreshed with the ‘… - button’. After a refresh, the IP address of every detected camera is also shown. This helps with setups that have several identical cameras distinguished only by their (consecutive) IP address.
Identification key: Determines how the camera is assigned to this image source and opened on connect: by IP address or by serial number. The key is never changed automatically, only by an explicit choice on this control; existing projects keep their previous assignment.
IP address: The camera is referenced by its (static) IP address. If a defective device is replaced by a new one at the same slot (same IP address), the new one automatically inherits the configuration. Recommended for installations with fixed IP addresses, and the default for newly assigned GigE cameras.
Serial number: The camera is referenced by its serial number, regardless of the current IP address. Recommended for installations with dynamic (DHCP-assigned) IP addresses.
Pixelformat: Pixel format in which the camera image is transferred. The list contains the pixel formats supported by the connected camera (e.g. Mono8).
Image acquisition:
Exposure: Exposure time in [ms]. With ‘Auto’, the camera controls the exposure time itself.
Gain: Gain factor (brightness) in [dB]. With ‘Auto’, the camera controls the gain itself.
Aqu. Timeout: Maximum image acquisition time in [ms].
Trigger Delay: Delay between the trigger and the start of the exposure in [ms].
Trigger: If selected, the camera is in trigger mode. An image is only acquired when the trigger is fired. If deselected, the camera runs in free-run mode. One of the following trigger sources can be selected:
Software: Software trigger, fired by Viper.NET during image acquisition.
Line0..LineN: Hardware trigger on the corresponding input.
Restart on acquisition failed: If selected, the acquisition mode of the camera is restarted after a failed image acquisition.
User ID: Camera name, which is stored in the camera by clicking the ‘set’ button.
UserSet: Here, the user parameter sets stored on the camera can be loaded (’Load’), or the current settings can be saved to a user parameter set of the camera (’Save’).
Dynamic GenICam first-class parameters: List of all GenICam features that were added to the parameter set on the ‘GenICam’ tab via the ‘Persist’ column. These features are saved with the job and written to the camera again on every parameter switch. The values can be edited here directly, without switching to the ‘GenICam’ tab.
Hint
Text input fields are only applied with the ‘Enter’ key. As long as the entered value differs from the stored value, the input field is highlighted in blue.
ROI settings
Here, an image section (ROI = Region Of Interest) can be configured. This way, no longer the whole camera chip is read out and transferred.
ROI Enabled: Enable or disable the image section. If disabled, the whole camera chip is read out and transferred.
X/Y/Width/Height: Selected image area. Position of the top left corner, width and height.
DisplayFinder: With the display finder, a Cognex display (e.g. FormLive) can be selected via drag & drop, which is used for an interactive input of the image section.
Apply ROI from rectangle: Apply the image section from the rectangle of the interactive input.
Cancel: Cancel the interactive image section selection (remove the rectangle from the display).
GenICam
On this tab, all GenICam features of the connected camera are displayed and can be edited directly.
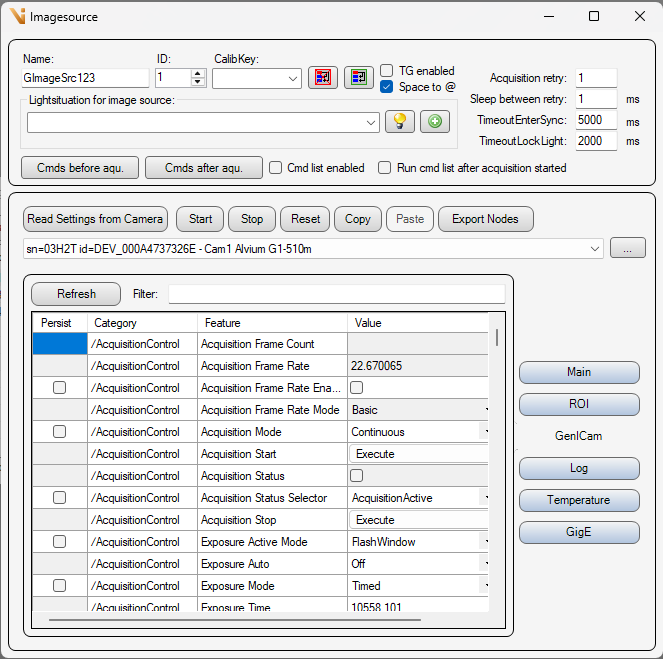
Refresh: Re-read all features from the camera and refresh the list.
Filter: Filter the list by feature name. The filter is cleared with the ‘Escape’ key.
Persist: If selected, the feature is saved with the job as a ‘dynamic first-class parameter’ and written to the camera again on every parameter switch. Persisted features are additionally displayed in the list on the ‘Main’ tab. Features that are already managed via the ‘Main’ tab (e.g. Exposure, Gain), as well as read-only features and commands, cannot be persisted.
Value: Depending on its type, the value of a feature can be changed via a selection list (enum), a checkbox (bool), a text input field (number/text, applied with ‘Enter’) or an ‘Execute’ button (command).
Values with a grey background are read-only.
Values with a yellow background are only locked because the image acquisition is currently running. When writing such a value, the image acquisition is briefly stopped and restarted automatically.
Event log
On the ‘Log’ tab, events of the camera and the image source are displayed (e.g. connection losses and successful reconnects).
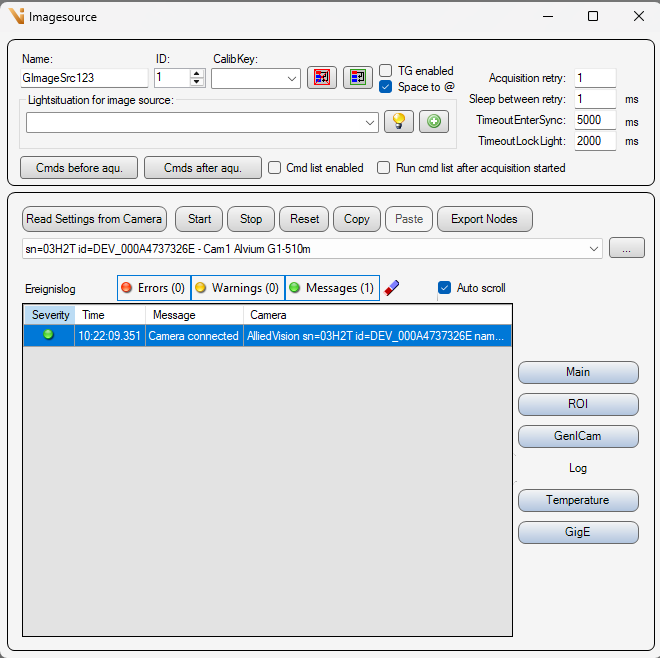
Errors/Warnings/Messages: Toggle the display of the corresponding event category. The number of events is shown on the buttons.
Eraser: Clear the event list.
Auto scroll: Automatically scroll to the latest event.
Temperature
On the ‘Temperature’ tab, all temperature sensors of the camera are displayed with their current values in [°C]. With ‘Read from Camera’, the temperature values are read out again.
Gigabit Ethernet settings
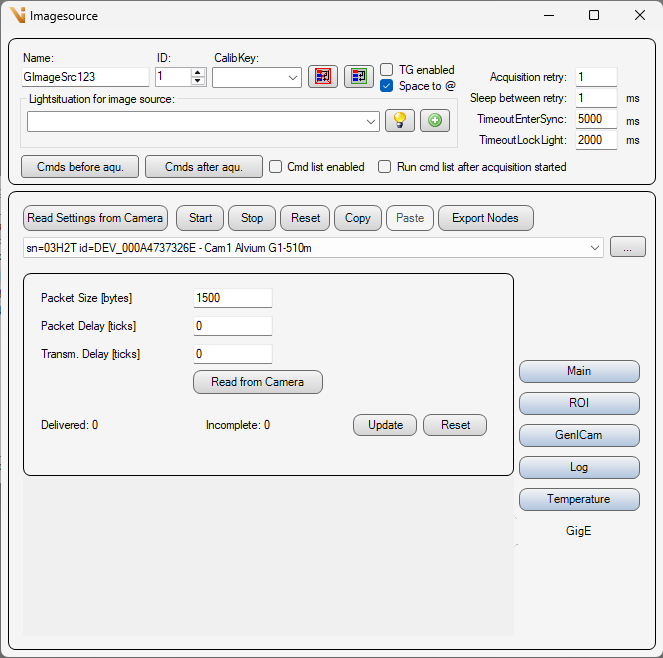
Packet Size [bytes]: Packet size in [bytes] for the transmission of the UDP packets of the image data.
Packet Delay [ticks]: Wait time in [ticks] between sending individual UDP data packets of the image data. This slows down the image data transmission and avoids possible data packet collisions or an “overrun” of the LAN adapter or the PC.
Transm. Delay [ticks]: Wait time in [ticks] until the camera starts to transfer the image data. If several cameras are triggered at the same time, it can be helpful to configure a different wait time for each camera in order to avoid data packet collisions.
Read from Camera: Read the GigE parameters from the camera.
Statistics (Delivered/Incomplete): Number of completely transferred and incomplete images. With ‘Update’, the statistics are read out again, with ‘Reset’ they are reset.
Hint
If ‘Adjust GigE packet size on connect’ is enabled in the global settings, the packet size is negotiated automatically when connecting to the camera.
Global settings
The system-wide basic settings of the Allied Vision interface are configured in the Global settings under ‘Advanced -> Edit acquisition interfaces’.
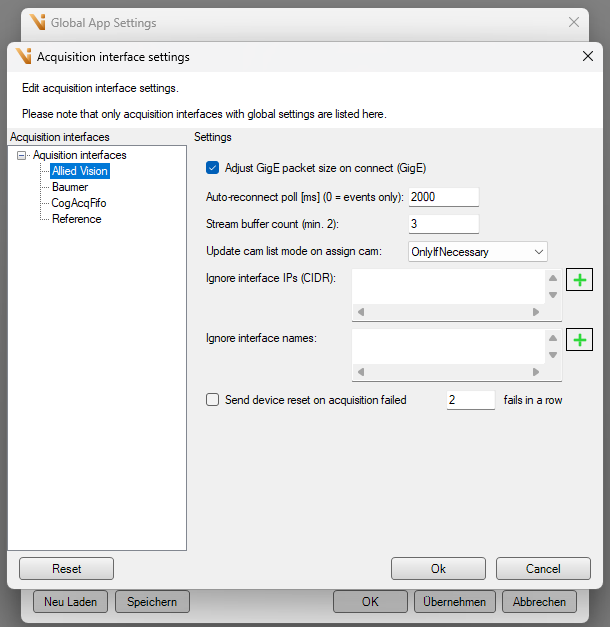
Adjust GigE packet size on connect (GigE): When connecting to a GigE camera, the maximum packet size is negotiated automatically with the LAN adapter (’GVSPAdjustPacketSize’).
Auto-reconnect poll [ms] (0 = events only): Cycle time in [ms] with which the background checks whether a disconnected camera is reachable again. Plugging in and unplugging a camera is additionally detected via events; this cyclic check serves as a fallback for GigE cameras where the event arrives delayed or not at all. With the value ‘0’, the cyclic check is disabled (only event-based reconnection).
Stream buffer count (min. 2): Number of image buffers for the acquisition stream. More buffers make the transmission more robust against dropouts at high frame rates or with large images (fewer incomplete images), but require more memory.
Update cam list mode on assign cam: Behaviour of the camera list refresh when assigning an image source to its camera:
OnlyIfNecessary: The camera list is only re-enumerated if no list exists yet.
Force: The camera list is always re-enumerated.
Ignore interface IPs (CIDR): List of LAN adapter IPs to be ignored during camera discovery. Each entry is an exact IPv4 address (e.g. “10.0.51.1”) or a CIDR range (e.g. “172.0.0.0/24”). Helpful on industrial PCs with several LAN adapters to keep the camera discovery off the wrong adapters.
Ignore interface names: List of LAN adapter names to be ignored during camera discovery (case-insensitive, a partial match is sufficient).
Send device reset on acquisition failed: If enabled, a GenICam ‘DeviceReset’ is sent to the camera after the configured number of consecutive failed image acquisitions. The camera thereby restarts and is then reconnected automatically. This function is only useful in free-run or software trigger mode — with a hardware trigger, a missing image simply means “no trigger” and not an error.